Chapter 12 - Options
Online Manual
Frequently Asked Questions
Data Recovery Basics
Chapter 1 - Introduction
Chapter 2 - Evaluation
Chapter 3 - Installation
Chapter 4 - Purchase
Chapter 5 - Activation
Chapter 6 - User Interface
Chapter 7 - Best Power Settings
Chapter 8 - File Recovery
Chapter 9 - Drive Recovery
Chapter 10 - Saving Files
Chapter 11 - Troubleshooting
Chapter 12 - Options
Chapter 13 - Raid Recovery
Chapter 14 - Disk Imaging
Chapter 15 - Customizing GUI
Chapter 16 - Legal
Appendix 1 - Technical Support
Appendix 2 - File Carving
Appendix 3 - References
Appendix 4 - Definitions
Appendix 5 - Icon Key
12.1 Display Options
Click on the “Options” button in the toolbar of the main program screen to set program options:
![]()
Default options can be reset at any time by selecting the “Reset to Defaults” button.
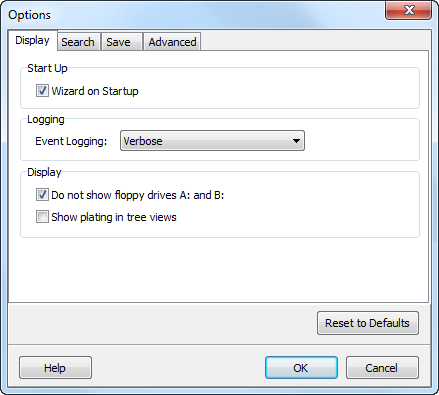
Wizard on Start up
This option controls whether the search wizard window opens automatically when the program starts.
Event Logging
This option controls the level of logging during processing. It is recommended that it be set at “None” or “Verbose” to maintain search speed. Do not use “Debug” or “Technical” unless instructed by GetData support staff.
Ignore floppy drives A: and B:
This option controls whether floppy drives connected to the computer are shown in the drive selection wizard window.
12.1.1 Show plating in tree views
One of the most powerful features of Tree view is the “show branch plate”. When the show branch plate is turned on, all files beneath that plate are displayed as a single list in List view. For example, this action can be used to display the contents of a folder and all of its sub folders and files.
To turn the branch plate on:
- Click Options > General > Display > Show plating option in tree views
- Click the plate icon next to the required folder (the plate will turn orange). The content of the folder and its sub folders will be displayed in the list view:
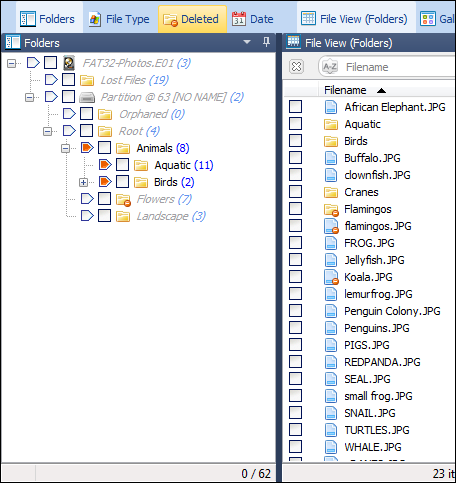
Plated folders are displayed in normal font. The non-plated folders are in grey italic.
To plate multiple branches;
- Click the first required plate with the mouse;
- Hold down the CTRL key and click the other required plates.
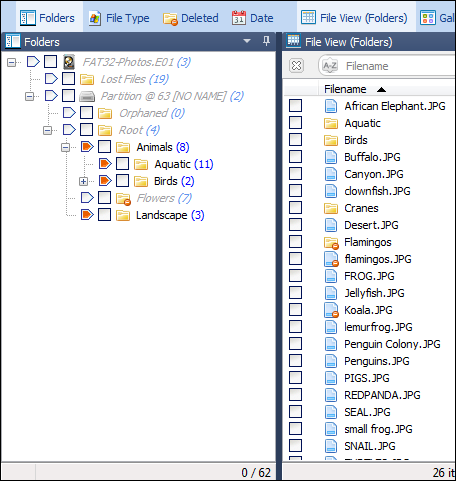
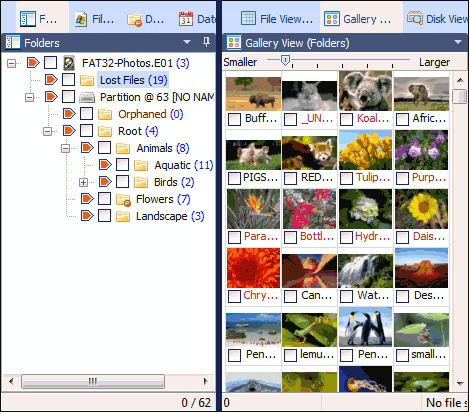
A useful application of the branch plate is to Gallery view all pictures on the drive. To do this, select the branch plate for the Root folder, Partition, or drive, and then switch to Gallery view (as shown in Figure 74 below):
12.2 Search options
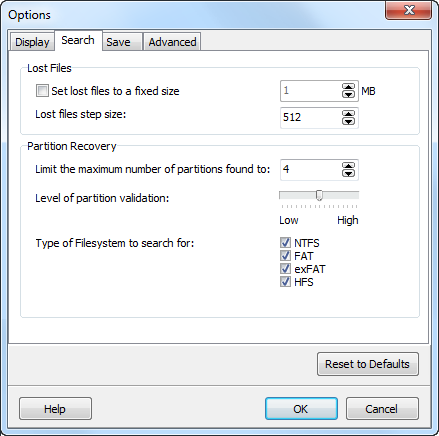
Lost Files
Lost Files are located by a sequential search of the drive looking for headers of selected file types. (See Data Recovery Fundamentals at the start of this manual for more information).
Set lost files to a fixed size
When a file header is located, calculations are performed to locate the end of the file. If the file end is not found it is assigned a default file size according to that file type. The size of lost files can be forced to a fixed size using this option.
Lost file step size
The step size control how the Lost File search sequentially steps down the drive looking for headers of selected file types. The default option is 512 bytes (sector by sector). Only change this option if you know the allocation size of the drive being searched.
Partition Recovery
Limit the maximum number of partitions found to:
This setting puts a limit on the number of recovered partitions displayed in search results screen. Each found partition is given a validity score, with the highest validity partitions added to the search results screen until this limit is reached. It is recommended that this setting be left at the default option.
Level of partition validation
This option controls the amount of processing to determine the validity of a recovered partition
A high setting is more likely to show valid partitions only. It will however increase processing time and may exclude some corrupt partitions from which files may have been recovered.
A low setting is likely to show all partitions, but some may contain invalid data.
It is recommended that this option be left at a balanced setting.
Type of File-system to search for
In a Recover Drive search, this option controls the types of File-systems that will be searched for. If the File-system that is trying to be recovered is known, the search speed can be improved by selecting only that File-system in the list. It can also make search results clearer by not recovering any unwanted partition types and presenting them in the search results.
Save options
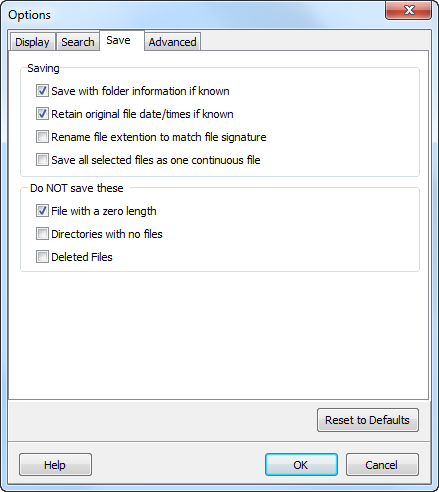
Save with folder information if known
Files are saved with the file and folder structure shown in the Folder data view. If this option is deselected, files will be saved into a single folder only.
Retain original file date/times if known
If this option is set the saved files will have the file date and times shown in the data views of the results screen. If this option is not selected, saved files will show the date and times when the save took place.
Rename file extension to match file signature
If this option is selected a file that has an extension which does not match the file signature (the header) will be renamed when saved. (See “Determine file type” in the “Search” options above).
Do NOT save these
Files with a zero length
If this option is set files with a 0kb length will not be saved.
Directories with no files
If this option is set empty folders will not be saved.
Deleted files
If this option is set, deleted files are not saved (i.e. files marked in the “Is Deleted” column as “Yes”). This option is usually set in a Drive Recover when the user wants to recover the file and folder structure from a drive but does not require any of the deleted files contained within that file-system.
Advanced options
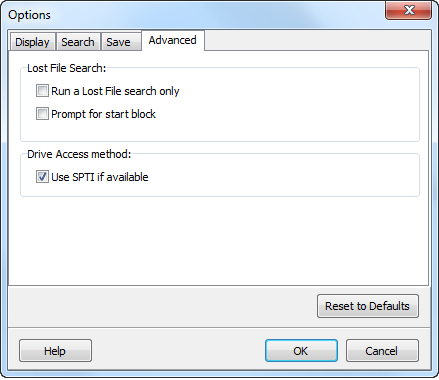
Run a Lost Files search only (do not read existing File-system)
When this option is selected, Recover My Files will search only for Lost Files (a sequential search of the drive for the file headers of the selected file types - Learn more about Lost Files in Data Recovery Fundamentals at the start of this manual).
Prompt for start sector
A Lost File search can be specified to start at any block on the drive. This option can be used to:
Process large drives in segments, rather than a search of an entire drive in one pass. For example, the drive can be divided into quarters and four separate searches run over each quarter of the drive.
Skip bad sections of a drive. For example, if a drive is known to have bad sectors at a certain point, a search can be stopped prior to this point and then a new search started after this point.
To seek out the starting point of a partition. For example, if an unallocated hard disk had two equal partitions the search could be started just prior to the middle of the disk to quickly locate the second partition.
When the “Prompt for start block” option is selected, the following window will appear when a search for Lost files commences:
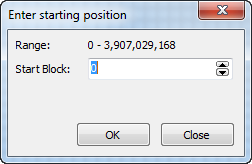
Enter the starting position and click ok. The search will commence from the block entered.
Use SPTI if available
SPTI (SCSI pass through Interface) is an API, allowing Microsoft Windows applications (starting with NT/2000) to work with SCSI-devices. It is recommended that this option is selected.
Reset to Default
Clicking the reset to defaults option is a global reset for Display, Search, Save and Advanced.